


Preface
This tutorial is a great way to get familiar with the nuances of setting up application permissions in K2 FIVE. After learning what it takes to set up such permissions, you will be especially interested in the next blog in this series: “How to Export and Import K2 FIVE Permission Settings.”
The Business Scenario
This tutorial provides step-by-step instructions for configuring authorization for K2 Applications to support the following sample business scenario:
A securities company has two applications, App A and App B. Because of SEC regulations, the two applications must be completely isolated:
- Developers of App A cannot be allowed to see or modify App B.
- Developers of App B cannot be allowed to see or modify App A.
- Users of App A cannot be allowed to view or change App B.
- Users of App B cannot be allowed to view or change App A.
- Administrators of App A cannot be allowed to view or change App B Administration settings.
- Administrators of App B cannot be allowed to view or change App A Administration settings.
- Users of both Applications cannot be allowed to access Administration settings for either Application.
Where the tutorial uses the domain name “bytezoomk2” please substitute your own domain name, along with valid user names from your own Active Directory.
Setting Application Permissions in K2 FIVE
To protect your applications from unauthorized use or unauthorized modification, you may want to control or restrict access to certain K2 application elements (e.g. Forms, Views, and SmartObjects) or Categories in your environment. The Authorization Framework allows you to do this, by configuring various levels of rights on elements in your K2 environment.
There are two ways to secure applications: by setting right on Categories and Forms, and by setting rights on workflows. You will likely need to set both, to secure your application’s elements. Use categories node to set rights on categories and forms. Use the following rights to control who can do what with categories and forms:
- View: View and Edit items at design time when using K2 Designer.
- Execute: View and run the item at runtime.
Workflow rights are set per workflow. Available rights are:
- Admin: administer the workflow definition and running instances of the workflow.
- Start: start new instances of the workflow.
- View: view all instances of the workflow in reports.
- Server Event: special right used for asynchronous server events.
TIP: It is recommended to use K2 roles to set security. Define Roles in the Users node, manage the role membership, and then give those roles the appropriate rights to categories, forms, and workflows as needed.
This tutorial illustrates how to configure category and form authorization segregated by application. It has five sections with step-by-step guidance to complete each.
- Create two simple K2 applications with Forms, Views and SmartObjects
- Specify Active Directory groups for each Application and use those to populate new K2 Roles
- Configure permissions for K2 Designer, SmartObjects and base Categories
- Configure permissions for K2 Demo Applications Categories
- Test results of permission settings.
Create two simple K2 applications with Forms, Views, and SmartObjects
- In K2 Designer, under All Items/Apps, create a category named “Protected”.
- Under “Protected,” create categories named “App A” and “App B”.
- In each App A and App B category, create the category structure shown below.
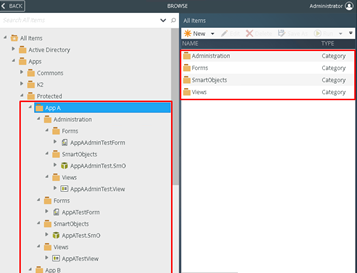
Create the SmartObjects, Views, and Forms for App A and App B.
Note: These can be built with minimal functionality. Using Copy As in K2 Designer saves time.
- Refresher: How to build a SmartBox SmartObject
- Refresher: How to build an Item View
- Refresher: How to build a Form
Specify Active Directory groups for each application and use those to populate new K2 Roles
1. In Active Directory Server Console create groups of users for App A and App B: Admins, Developers, and Users.
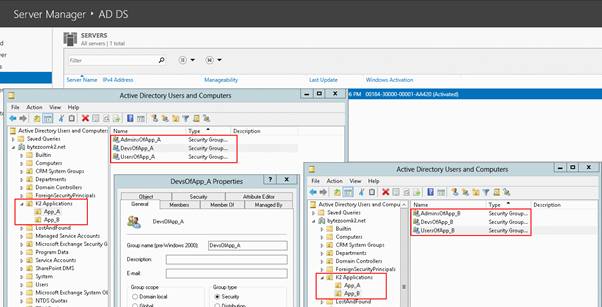
- Open Server Manager Dashboard -> Tools -> Active Directory Users and Computers
- Select Domain Name, in mouse right button menu, New -> Organizational Unit
- Create “K2 Application” Unit, and select it
- Create Units “App_A” and “App_B” in “K2 Application”
- Create Groups “AdminsOfApp_A”, “DevsOfApp_A”, “UsersOfApp_A” in “App_A” Unit
- Create Groups “AdminsOfApp_B”, “DevsOfApp_B”, “UsersOfApp_B” in “App_B” Unit
- Add Member Users to each created Groups in “Members” Tab of Group Item Properties:
- AdminsOfApp_A – Bob Maggio; DevsOfApp_A – Rick Cowan; UsersOfApp_A – Anthony Petro
- AdminsOfApp_B – Bob Maggio; DevsOfApp_B – Mark Green; UsersOfApp_B – Blake Carrigan
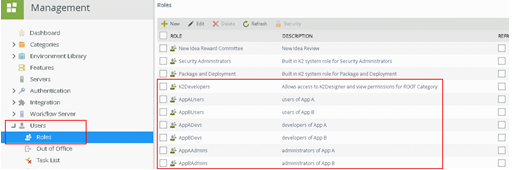
2. In K2 Management / Users / Roles, Add new K2 Roles, populating each role with AD groups shown.
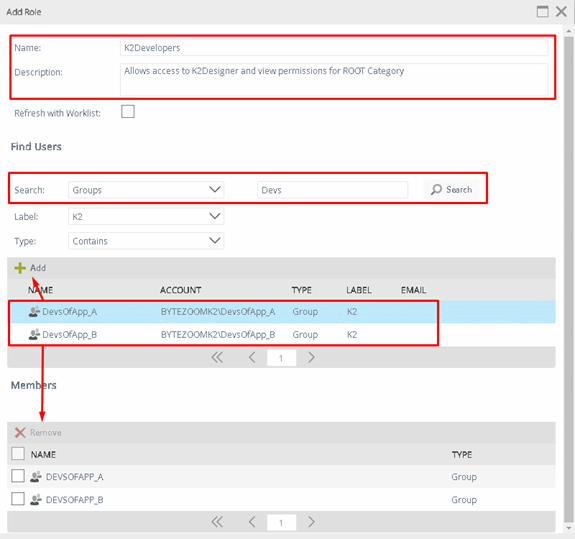
- Open K2 Management Panel, in the Left Panel Menu select Users -> Roles
- In the Toolbar Click the “New” Button
- Set the Name and Description for the role “K2Developers”
- In Find Users, Search Drop down list set as “Groups” and Input “Devs” near the “Search” Button, then click the button. In the results list, select the rows with developer groups and click the “Add” Toolbar button to add groups to the members of role.
- Click the “OK” button to create the role.
- Create Roles for each AD groups of K2 applications: “AppAUsers”, “AppADevs”, “AppAAdmins”, “AppBUsers”, “AppBDevs”, and “AppBAdmins”.
Configure permissions for K2 Designer, SmartObjects and base Categories
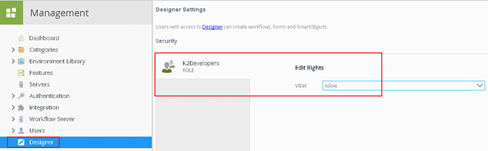
- Allow access to K2 Designer for K2Developers Role only

- Open K2 Management, in the left pane, select Designer.
- Under Security in the right pane, remove the “Everyone” role by dragging it to the garbage can icon.
- Use the plus icon to add “K2Developers” Role and set “Allow” Rights for it as shown in the image above.
2. Set SmartBox Security permissions for developer AD groups, DEVSOFAPP_A, and DEVSOFAPP_B
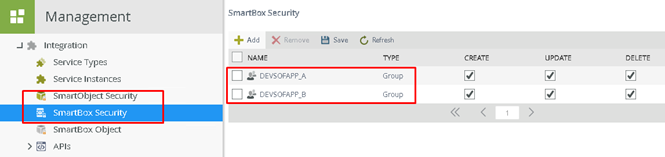
- Open K2 Management Panel, in the Left Panel Menu select Integration -> SmartBox Security
- Use “Add” button on Toolbar panel to add AD Developer groups, and set permissions for Create, Update and Delete actions.
- Use the “Save” button on the Toolbar panel to save changes.
3. Configure base permissions for base Categories.

- Open K2 Management, in the Left Pane select Categories
- In the right pane under Security, remove the “Everyone” Role by dragging it to the garbage can symbol.
- Add “K2Developers” Role and set “Allow” Rights for “VIEW”, set “None” Rights for “EXECUTE”
Note: View provides access from Designer to objects and Execute permission from Runtime to run forms.
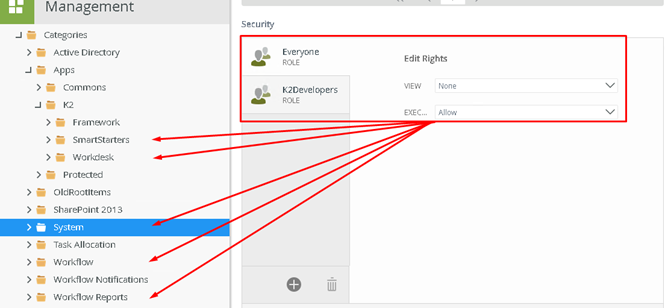
4. To provide permissions previously inherited from the base Category, explicitly Allow the “Everyone” role to Execute forms under “System” and “K2” categories.
- One by one, select Categories: System, Workflow, Workflow Reports, Apps\K2\SmartStarters, Apps\K2\Workdesk; and add “Everyone” Role and set “Allow” Rights for the “EXECUTE” Action.

Note: The list of categories may not be complete for your server. Most likely, you will want to set rights to other categories, as detailed in K2 Categories documentation:
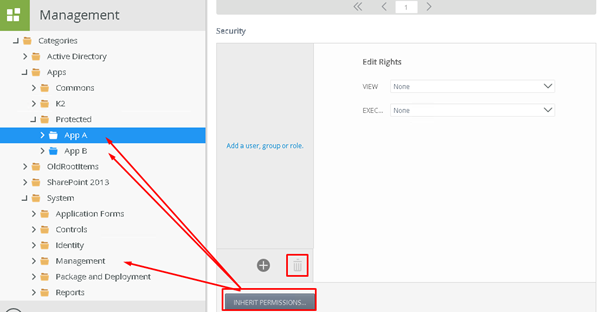
5. BREAK INHERITANCE for Demo Apps Categories and Management Category. Remove Access Rights for those

- Select Categories one by one: System\Management, Apps\Protected\App A, Apps\Protected\App B. Use Button “BREAK INHERITANCE” to disable category permissions rights inheritance.
- Also remove all Users, Group and Roles from selected categories Security rights.
Configure permissions for K2 Application Categories
- Allow access to K2 Designer for K2Developers Role only
- Open K2 Management, in the left pane, select Designer.
- Under Security in the right pane, remove the “Everyone” role by dragging it to the garbage can icon.
- Use the plus icon to add “K2Developers” Role and set “Allow” Rights for it as shown in the image above.
2. Set SmartBox Security permissions for developer AD groups, DEVSOFAPP_A, and DEVSOFAPP_B
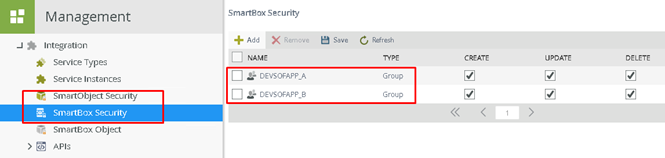
- Open K2 Management Panel, in the Left Panel Menu select Integration -> SmartBox Security
- Use “Add” button on Toolbar panel to add AD Developer groups, and set permissions for Create, Update and Delete actions.
- Use the “Save” button on the Toolbar panel to save changes.
3. Configure base permissions for base Categories.

- Open K2 Management, in the Left Pane select Categories
- In the right pane under Security, remove the “Everyone” Role by dragging it to the garbage can symbol.
- Add “K2Developers” Role and set “Allow” Rights for “VIEW”, set “None” Rights for “EXECUTE”
Note: View provides access from Designer to objects and Execute permission from Runtime to run forms.
4. To provide permissions previously inherited from the base Category, explicitly Allow the “Everyone” role to Execute forms under “System” and “K2” categories.
- One by one, select Categories: System, Workflow, Workflow Reports, Apps\K2\SmartStarters, Apps\K2\Workdesk; and add “Everyone” Role and set “Allow” Rights for the “EXECUTE” Action.
Note: The list of categories may not be complete for your server. Most likely, you will want to set rights to other categories, as detailed in K2 Categories documentation:
5. BREAK INHERITANCE for Demo Apps Categories and Management Category. Remove Access Rights for those.
- Select Categories one by one: System\Management, Apps\Protected\App A, Apps\Protected\App B. Use Button “BREAK INHERITANCE” to disable category permissions rights inheritance.
- Also remove all Users, Group and Roles from selected categories Security rights.
Configure permissions for K2 Application Categories
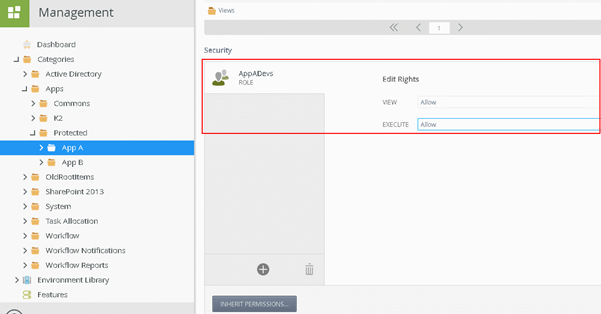
1. Add “AppADevs” Role to “Apps\Protected\App A” Category Security and “AppBDevs” Role to “Apps\Protected\App B” Category Security and set “Allow” Rights for “VIEW” and “EXECUTE” Actions.
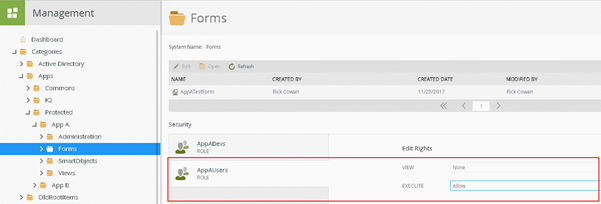
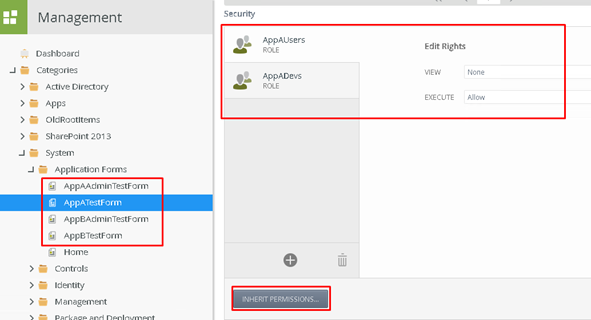
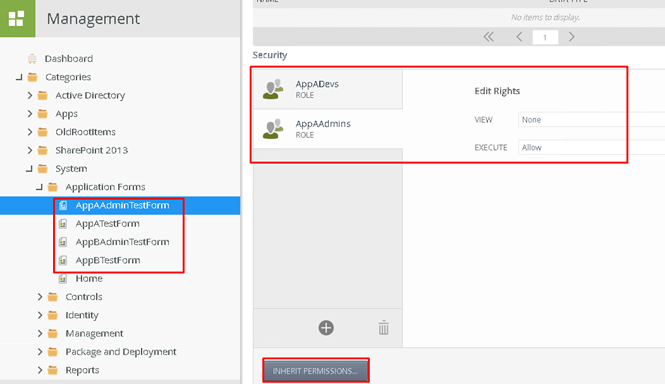
2. Add “AppAUsers” Role to “Apps\Protected\App A\Forms” Category Security and “AppBUsers” Role to “Apps\Protected\App B\Forms” Category Security and set “Allow” Rights to “EXECUTE” Action.
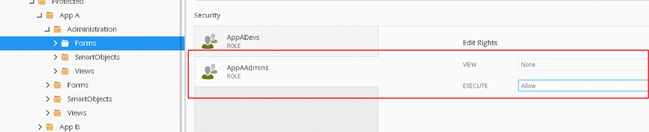
3. Add “AppAAdmins” Role to “Apps\Protected\App A\Administration\Forms” Category Security and “AppBAdmins” Role to “Apps\Protected\App B\Administration\Forms” Category Security and set “Allow” Rights to “EXECUTE” Action.
Note: If you have Application forms for Demo Applications in “System\Application Forms” Category, so check permission rights for this objects. Users and Admins need to have “Allow” Rights to “EXECUTE” Action.
Test results of permission settings
Check permission settings of App Categories authorized in K2 with users from different roles.
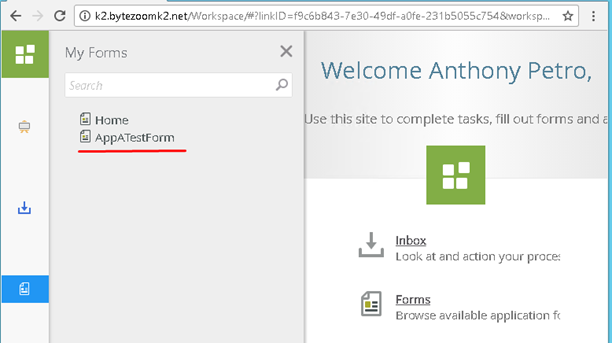
- Anthony Petro is member of UsersOfApp_A AD group (AppAUsers Role). Verify that he does not have access to K2 Designer.
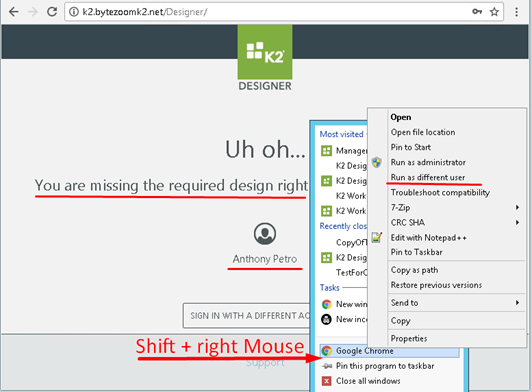
Note: To open Browser window as a different user, right click with pressed Shift Key and select “Run as different user” item in context menu. Then Authorize with user credentials.
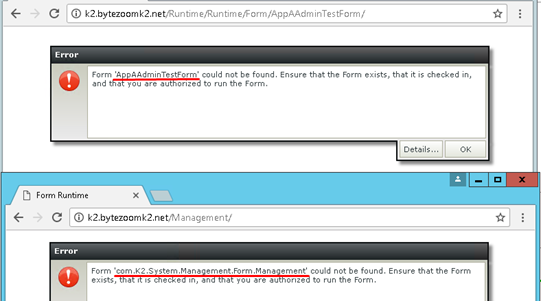
2. Verify that Anthony Petro also does not have access to App Admin Forms or Management forms.
3. Verify that Anthony Petro does have access to “App A” Form and can see it in the Workspace.
4. Another user Rick Cowan is member of DevsOfApp_A, AD group (AppADevs Role). Verify that he has access to K2 Designer and has access to “App A” Category, and yet cannot see the “App B” Category.
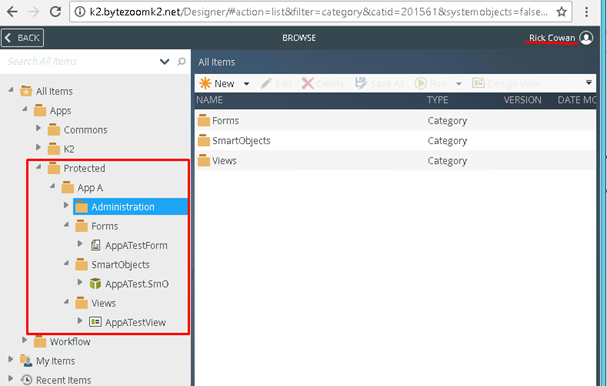
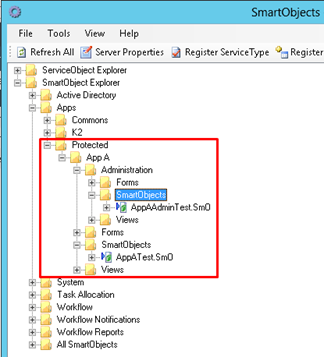
5. Verify that Rick also cannot see “App B” Category in SmartObjects Services Tester utility.

Be the first to comment